
Contents
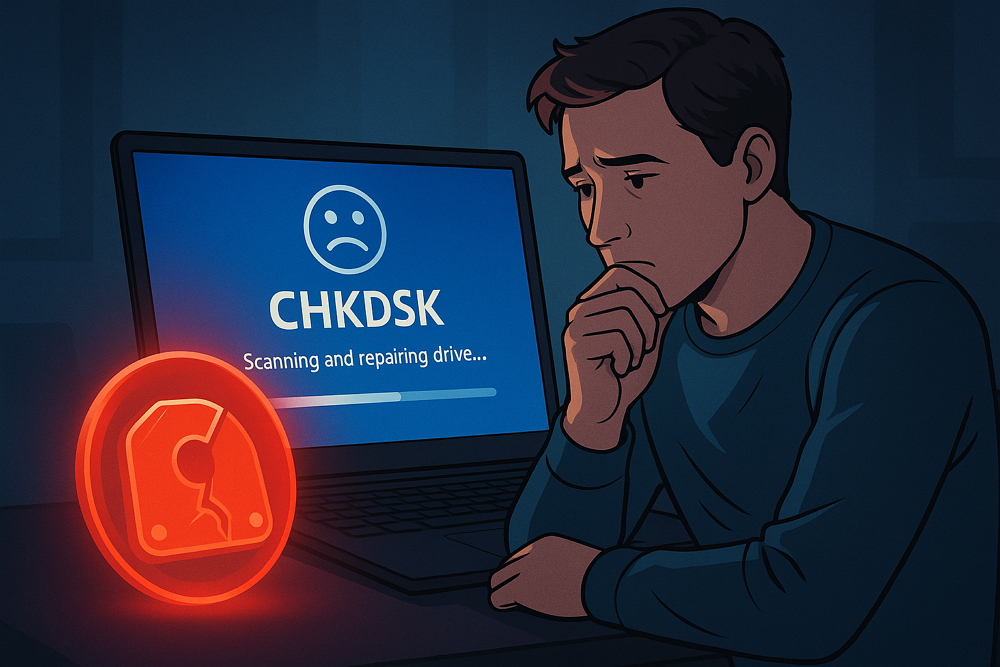
Many times, Windows is unable to scan your drive for problems while the system is running. It mostly happens when the disk is already in use or has serious errors. At this point, Check Disk might also fail or get stuck. To handle this situation, it is better to run CHKDSK from boot in Windows 11. This means the scan will happen before Windows fully starts, which will solve deeper issues more easily.
In this guide, you’ll learn two easy ways to run CHKDSK outside the typical Windows environment. We’ll show you how to schedule a scan for the next restart and how to use the Advanced Startup menu to run it manually. If CHKDSK isn’t working at all, we’ll also cover some simple troubleshooting tips. You can also visit the parent post for a full overview of CHKDSK, SFC, and DISM repair tools
Part 1. What Is CHKDSK and When Should You Use It?
CHKDSK, short for Check Disk, is a built-in Windows tool that scans your hard drive for errors and tries to fix them. It checks the file system structure, finds bad sectors, and repairs logical issues that may cause your computer to slow down, freeze, or crash.
You should use CHKDSK when you encounter corrupt drives, strange error messages, or unresponsive folders or files. It’s especially helpful for fixing problems caused by improper shutdowns or power failures. While it can usually be run from within Windows, it sometimes needs exclusive access to the drive, which means it has to run before Windows fully loads.
If you’re curious how CHKDSK compares with other system repair tools like SFC and DISM, check out the complete guide: How to Fix Disk Errors on Windows 11.
Part 2. Schedule CHKDSK for Next Boot
If your system drive (usually C:) is in use, Windows won’t be able to run CHKDSK immediately. In that case, you can schedule it to run the next time your PC restarts, before Windows loads.
Here’s how to do it to Run CHKDSK from Boot in Windows:
Start by clicking Start, typing cmd, then right-click Command Prompt and choose Run as administrator.
Enter this command:
Bash CopyEdit chkdsk C: /f /r
- /f tells CHKDSK to fix errors. /r finds bad sectors and recovers readable data. If you see a message saying the drive is in use and asks: pgsql CopyEdit
Would you like to schedule this volume to be checked the next time the system restarts? (Y/N) - Type Y and press Enter.
- Restart your PC, and CHKDSK will automatically run during startup.
Why does this work?
Windows marks a “dirty bit” on the drive when it knows the disk needs to be checked. Running CHKDSK before Windows boots allows it to scan and repair the drive without interference from system processes. This is especially useful when your system is unstable or crashing often.
Part 3. Run CHKDSK from Advanced Startup
If your system can’t boot properly, or CHKDSK fails to schedule from within Windows, you can launch CHKDSK manually from the recovery environment.
Follow these steps to Run CHKDSK from Boot in Windows 11:
- Enter Advanced Startup
Press Shift and click Restart from the login screen or Start menu. Or go to Settings → System → Recovery, then under Advanced Startup, click Restart now.

- When your PC restarts, choose: Troubleshoot → Advanced options → Command Prompt
In the Command Prompt window that opens, type: Bash CopyEdit chkdsk C: /f /r
- Press Enter, and CHKDSK will begin scanning immediately.
This method bypasses file locking during everyday use, making it more reliable for scanning and fixing system files on your primary drive.
Part 4. What to Do if CHKDSK Is Stuck or Not Working
Sometimes, CHKDSK might freeze at a certain percentage or refuse to start at all. Here’s what you can try if that happens:
Common Fixes:
- Restart in Safe Mode
Boot your PC into Safe Mode and try running CHKDSK again. Safe Mode loads only essential services, making it easier for CHKDSK to access the drive. - Disconnect External Drives
Sometimes external storage devices (USBs, external HDDs) cause interference. Unplug them and re-run the scan.
Try Other Repair Tools
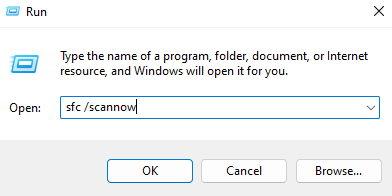
If CHKDSK still doesn’t work, it could be a system file or Windows image issue. Run:sfc /scannow
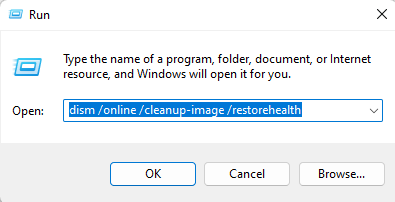
and if that fails, follow with: dism /online /cleanup-image /restorehealth
For a deeper understanding of how these tools differ and when to use each, check out sfc-scannow not working in windows 11.
Frequently Asked Questions
Q1. Is it safe to interrupt CHKDSK if it’s stuck?
It’s not recommended. CHKDSK might be working in the background even if it looks frozen. If it stays unresponsive for several hours, you can restart your PC, but there’s a slight risk of data loss.
Q2. Can I run CHKDSK on an external USB drive?
Yes, you can. Open Command Prompt, find the drive letter of the USB, and run chkdsk E: /f /r (replace E: with the actual letter).
Q3. Will CHKDSK delete any of my personal files?
CHKDSK doesn’t delete regular files. However, it may move severely corrupted data to a folder called found.000, which could result in data loss for those specific files. Always back up important data before running disk checks.
Conclusion
Knowing how to run CHKDSK from boot in Windows 11 is a powerful way to fix deeper disk errors that regular scans can’t handle. Whether your system is crashing, freezing, or showing file errors, boot-time CHKDSK gives Windows full access to scan and repair your drive safely. You can handle issues that would otherwise remain hidden by using either the scheduled scan method or the Advanced Startup Command Prompt.
And if things still go wrong, don’t worry—tools like SFC and DISM are there to help. With the right approach, you can regain your PC’s stability without needing a complete reinstall.
2 thoughts on “How to Run CHKDSK from Boot in Windows 11”